Difference between revisions of "Rifter"

From EVE University Wiki
Jump to: navigation, search
(→‎Summary: I was a little harsh)
Line 85: Line 85:
  
 
==Fitting==
 
==Fitting==
 
===Generic Eve Uni Fittings===
 
 
These fittings were designed by Unistas to help a new eve player, as a consequence they are designed to be a fit that is quick to get into and cheap to fly, not necessarily the best.


{{ShipFitting|
 
{{ShipFitting|
ship=Rifter|
 
shipTypeID=587|
 
fitName=Tackling|
 
fitID=Tackling|
 
high1name=200mm AutoCannon I|
 
high1typeID=486|
 
high2name=200mm AutoCannon I|
 
high2typeID=486|
 
high3name=200mm AutoCannon I|
 
high3typeID=486|
 
high4name=Light Missile Launcher I|
 
high4typeID=499|
 
mid1name=1MN Microwarpdrive I|
 
mid1typeID=434|
 
mid2name=Stasis Webifier I|
 
mid2typeID=526|
 
mid3name=Warp Disruptor I|
 
mid3typeID=3242|
 
low1name=Nanofiber Internal Structure I|
 
low1typeID=2603|
 
low2name=Overdrive Injector System I|
 
low2typeID=1244|
 
low3name=Overdrive Injector System I|
 
low3typeID=1244|
 
charge1name=EMP S x1|
 
charge1typeID=185|
 
charge2name=Mjolnir Light Missile x1|
 
charge2typeID=212|
 
charge3name=open|
 
charge4name=open|
 
charge5name=open|
 
rig1name=open|
 
rig2name=open|
 
rig3name=open|
 
difficulty=0|
 
warsop=A|
 
warsopReason=|
 
version=RET 1.0|
 
shipDNA=587:486;3:499;1:434;1:526;1:3242;1:1244;2:2603;1:185;1:212;1::|
 
skills=Minmatar Frigate III</li><li>Missile Launcher Operation I</li><li>Capacitor Systems Operation III</li><li>Capacitor Management III</li><li>Energy Grid Upgrades II</li><li>Electronics Upgrades I</li><li>Long Range Targeting II</li><li>Targeting IV</li><li>Signature Analysis III</li><li>Hull Upgrades I</li><li>Light Missiles I</li><li>Evasive Maneuvering II</li><li>Warp Drive Operation II</li><li>Mechanics III</li><li>Hull Upgrades III</li><li>Shield Management III</li><li>Repair Systems III</li><li>Missile Launcher Operation III</li><li>Propulsion Jamming I</li><li>High Speed Maneuvering I</li><li>Gunnery III</li><li>Rapid Firing II</li><li>Sharpshooter I</li><li>Motion Prediction III</li><li>Gunnery IV</li><li>Trajectory Analysis II|
 
notes=This setup is intended for '''fleet''' use. See the [[Tackling_101_Guide|tackling guide]].</li><li>Because it has no tank beyond its speed, this fit won't survive long against drones or accurate fire; if you have a few more fitting skills you may want to investigate slower but tougher Rifter fits.}}    {{ShipFitting|
 
 
ship=Rifter|
 
ship=Rifter|
 
shipTypeID=587|
 
shipTypeID=587|
Line 170: Line 125:
 
shipDNA=587:484;3:2529;1:3829;1:6003;1:2331;3:183;1::|
 
shipDNA=587:484;3:2529;1:3829;1:6003;1:2331;3:183;1::|
 
skills=Energy Grid Upgrades II</li><li>Shield Operation II</li><li>Gunnery II</li><li>Small Projectile Turret III</li><li>Afterburner I</li><li>Minmatar Frigate III</li><li>Shield Upgrades I|
 
skills=Energy Grid Upgrades II</li><li>Shield Operation II</li><li>Gunnery II</li><li>Small Projectile Turret III</li><li>Afterburner I</li><li>Minmatar Frigate III</li><li>Shield Upgrades I|
notes=With recommended skills, this setup tanks 20 dps from Angels and can run the afterburner for over 5 minutes.</li><li>You could run the afterburner indefinitely either by training Afterburner III and Energy Systems Operation III or by replacing one Shield Power Relay with a Power Diagnostic System I (weakening the tank slightly).</li><li>With Engineering IV you have the option of fitting 150mm autocannons.}}
+
notes=With recommended skills, this setup tanks 20 dps from Angels and can run the afterburner for over 5 minutes.</li><li>You could run the afterburner indefinitely either by training Afterburner III and Energy Systems Operation III or by replacing one Shield Power Relay with a Power Diagnostic System I (weakening the tank slightly).</li><li>With Engineering IV you have the option of fitting 150mm autocannons.}}<!--
  
{{ShipFitting|
+
-->{{ShipFitting|
 
ship=Rifter|
 
ship=Rifter|
 
shipTypeID=587|
 
shipTypeID=587|
fitName=PvP T2 AC|
+
fitName=Tackle|
fitID=PvP-T2-ac|
+
fitID=Tackle|
high1name=150mm Light AutoCannon II|
+
high1name=125mm Gatling AutoCannon II|
high1typeID=2881|
+
high1typeID=2873|
high2name=150mm Light AutoCannon II|
+
high2name=125mm Gatling AutoCannon II|
high2typeID=2881|
+
high2typeID=2873|
high3name=150mm Light AutoCannon II|
+
high3name=125mm Gatling AutoCannon II|
high3typeID=2881|
+
high3typeID=2873|
high4name=open|
 
mid1name=1MN Afterburner II|
 
mid1typeID=438|
 
mid2name=Medium Subordinate Screen Stabilizer I|
 
mid2typeID=8397|
 
mid3name=Fleeting Warp Disruptor I|
 
mid3typeID=5401|
 
low1name=Gyrostabilizer II|
 
low1typeID=519|
 
low2name=Damage Control II|
 
low2typeID=2048|
 
low3name=Nanofiber Internal Structure II|
 
low3typeID=2605|
 
charge1name=Barrage S x1|
 
charge1typeID=12625|
 
charge2name=open|
 
charge3name=open|
 
charge4name=open|
 
charge5name=open|
 
rig1name=Small Core Defense Field Extender I|
 
rig1typeID=31788|
 
rig2name=Small Core Defense Field Extender I|
 
rig2typeID=31788|
 
rig3name=Small Core Defense Field Extender I|
 
rig3typeID=31788|
 
difficulty=2|
 
warsop=A|
 
warsopReason=|
 
version=RET 1.0|
 
shipDNA=587:2881;3:438;1:5401;1:8397;1:519;1:2048;1:2605;1:31788;3:12625;1::|
 
skills=Engineering V</li><li>Electronics IV</li><li>Weapon Upgrades III|
 
notes=The rigs are the most expensive on this ship, but it gets the job done. Alternatively one can chose to use +resist rigs in the form of EM, Thermic and Kinetic resist rigs.</li><li>This is a skill heavy fit. It's useful as secondary point and as a damage dealer. One sacrifices the MWD for heavier guns and a passive shield buffer.}}    {{ShipFitting|
 
ship=Rifter|
 
shipTypeID=587|
 
fitName=Close Range Tackle T1|
 
fitID=Close-Range-Tackle-T1|
 
high1name=150mm Light AutoCannon I|
 
high1typeID=485|
 
high2name=150mm Light AutoCannon I|
 
high2typeID=485|
 
high3name=150mm Light AutoCannon I|
 
high3typeID=485|
 
high4name=open|
 
mid1name=1MN Microwarpdrive I|
 
mid1typeID=434|
 
mid2name=Warp Scrambler I|
 
mid2typeID=447|
 
mid3name=Medium Shield Extender I|
 
mid3typeID=3829|
 
low1name=Damage Control I|
 
low1typeID=2046|
 
low2name=Micro Auxiliary Power Core I|
 
low2typeID=11563|
 
low3name=Overdrive Injector System I|
 
low3typeID=1244|
 
charge1name=Phased Plasma S x1|
 
charge1typeID=184|
 
charge2name=open|
 
charge3name=open|
 
charge4name=open|
 
charge5name=open|
 
rig1name=Small Anti-EM Screen Reinforcer I|
 
rig1typeID=31716|
 
rig2name=Small Anti-Thermal Screen Reinforcer I|
 
rig2typeID=31752|
 
rig3name=Small Anti-Kinetic Screen Reinforcer I|
 
rig3typeID=31740|
 
difficulty=0|
 
warsop=A|
 
warsopReason=|
 
version=RET 1.0|
 
shipDNA=587:485;3:434;1:447;1:3829;1:1244;1:2046;1:11563;1:31716;1:31740;1:31752;1:184;1::|
 
skills=|
 
notes=This fit is from Azual Skoll. For a full discussion of tackling and this fit, please visit http://www.evealtruist.com/2012/08/newbie-tackling-guide.html}}


{{ShipFitting|
 
ship=Rifter|
 
shipTypeID=587|
 
fitName=Close Range Tackle T2|
 
fitID=Close-Range-Tackle-T2|
 
high1name=150mm Light AutoCannon II|
 
high1typeID=2881|
 
high2name=150mm Light AutoCannon II|
 
high2typeID=2881|
 
high3name=150mm Light AutoCannon II|
 
high3typeID=2881|
 
 
high4name=open|
 
high4name=open|
 
mid1name=Limited 1MN Microwarpdrive I|
 
mid1name=Limited 1MN Microwarpdrive I|
Line 278: Line 147:
 
low1name=Damage Control II|
 
low1name=Damage Control II|
 
low1typeID=2048|
 
low1typeID=2048|
low2name=Micro Auxiliary Power Core I|
+
low2name=Nanofiber Internal Structure II|
low2typeID=11563|
+
low2typeID=2605|
low3name=Overdrive Injector System II|
+
low3name=Gyrostabilizer II|
low3typeID=1236|
+
low3typeID=519|
charge1name=Republic Fleet Phased Plasma S x1|
 
charge1typeID=21924|
 
charge2name=open|
 
charge3name=open|
 
charge4name=open|
 
charge5name=open|
 
 
rig1name=Small Anti-EM Screen Reinforcer I|
 
rig1name=Small Anti-EM Screen Reinforcer I|
 
rig1typeID=31716|
 
rig1typeID=31716|
rig2name=Small Core Defense Field Extender I|
+
rig2name=Small Anti-EM Screen Reinforcer I|
rig2typeID=31788|
+
rig2typeID=31716|
rig3name=Small Core Defense Field Extender I|
+
rig3name=Small Anti-Thermal Screen Reinforcer I|
rig3typeID=31788|
+
rig3typeID=31752|
difficulty=2|
+
difficulty=0|
warsop=A|
+
warsop=S|
warsopReason=|
+
warsopReason=Faction hull|
version=RET 1.0|
+
version=RUBI 1.0|
shipDNA=587:2881;3:3831;1:5443;1:5973;1:1236;1:2048;1:11563;1:31716;1:31788;2:21924;1::|
+
shipDNA=587:2873;3:3831;1:5443;1:5973;1:519;1:2048;1:2605;1:31716;2:31752;1::|
 
skills=|
 
skills=|
notes=This fit is from Azual Skoll. For a full discussion of tackling and this fit, please visit http://www.evealtruist.com/2012/08/newbie-tackling-guide.html}}
+
notes=Meta mods as necessary (for SP/ISK considerations)</li><li>Fly a [[Slasher]] or [[Merlin]] instead}}
  
 
==Tactics==
 
==Tactics==

Revision as of 11:09, 27 December 2013
EVE University Database
 
Ship Database
Rifter
Rifter
Minmatar Republic
Minmatar Republic
Standard Frigates
Rifter Class
RELATED UNI-WIKI REFERENCES

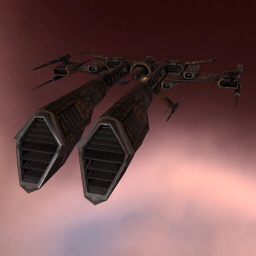
The Rifter is a very powerful combat frigate and can easily tackle the best frigates out there. It has gone through many radical design phases since its inauguration during the Minmatar Rebellion. The Rifter has a wide variety of offensive capabilities, making it an unpredictable and deadly adversary.

SHIP BONUSES

Traits:
Minmatar Frigate skill bonus per level:
5% bonus to Small Projectile Turret damage
7.5% bonus to Small Projectile Turret tracking

Required Skills
  • Minmatar Frigate I16m
    • Spaceship Command I8m
Training Time what's this?
0d 0h 24m
Estimated training time only for the listed skills based on zero implants and without neural remaps.
Grouping
▪ Variations
Jaguar
Jaguar.jpg
CornerT2s.png
Jaguar
Assault Frigates Rifter Class
Icon hi slot.png4 (3/1) Icon mid slot.png5 Icon low slot.png3
Icon powergrid.png39 MW Icon cpu.png180 tf
Icon velocity.png368 m/sec
Icon capacity.png130 m³
, Wolf
Wolf.jpg
CornerT2s.png
Wolf
Assault Frigates Rifter Class
Icon hi slot.png5 (1/4) Icon mid slot.png2 Icon low slot.png5
Icon powergrid.png48 MW Icon cpu.png135 tf
Icon velocity.png375 m/sec
Icon capacity.png165 m³

Ship Attributes

Fittings
Powergrid
powergrid
38 MW
CPU
cpu output
125 tf
Capacitor
capacitor
250 GJ
High
high slots
4
Launchers
launcher slots
2
Turrets
turret slots
3
Medium
medium slots
3
Low
low slots
3
Rig
rigs
3
 
small
Calibration
calibration
400
Navigation
Max Velocity
max. velocity
355 m/s
Inertia Modifier
inertia modifier (agility)
3.19
Warp Speed
inertia modifier (agility)
5 AU/s
Base Time to Warp
base time to warp
4.72 s
what's this?
Base Time to Warp is essentially the time needed for this ship to align and accelerate until it reaches 75% of its top speed and goes to warp. The time displayed here is the base calculated time with no account for any warp related skills, modules or any other effects.
Drones
Drone Capacity
drone capacity
0 m³
Drone Bandwidth
drone bandwidth
0 Mbit/sec
Targeting
Max Tgt. Range
max. targeting range
22.5 km
Max Locked Targets
max. locked targets
4
LADAR Sensor
LADAR sensor strength
8 points
Sig. Radius
signature radius
35 m
Scan Res.
scan resolution
660 mm
Structure
Structure Hitpoints
structure hitpoints
350 HP
Mass
ship mass
1,067,000 kg
Volume
ship volume
27,289 m³
Cargo Capacity
cargo capacity
140 m³
Armor
Armor Hitpoints
armor hitpoints
450 HP
Armor Resistances
EM
electromagnetic resistance
60
THR
thermal resistance
35
KIN
kinetic resistance
25
EXP
explosive resistance
10
Shields
Shield Capacity
shield hitpoints
450 HP
Shield Resistances
EM
electromagnetic resistance
0
THR
thermal resistance
20
KIN
kinetic resistance
40
EXP
explosive resistance
50


Summary

The Rifter is the primary damage frigate for Minmatar. For tackling a Slasher or Merlin is by far better. While the Rifter used to be considered the best T1 frigate (leading to many memes surrounding it), it has been nerfed to be similar in abilities to the others.

Skills

Further information about additional or recommended skills to pilot Rifter for a specific or it's common role(s) can be written here.

Fitting

PvE Basic Skills Rifter
Rifter: PvE Basic Skills Rifter
EFT
[Rifter, PvE Basic Skills Rifter]
125mm Gatling AutoCannon I

Experimental 1MN Afterburner I
Explosive Deflection Amplifier I
Medium Shield Extender I

Shield Power Relay I


Fusion S x1

Fitting template high slot label.png
icon?size=64&.png
icon?size=64&.png
icon?size=64&.png
Icon hi slot.png
Fitting template mid slots label.png
icon?size=64&.png
icon?size=64&.png
icon?size=64&.png
Fitting template low slots label.png
icon?size=64&.png
icon?size=64&.png
icon?size=64&.png
Fitting template subsystem slots label.png
Fitting template drone slots label.png
Fitting template charge slots label.png
icon?size=64&.png
Fitting template rig slots label.png
Icon rigs.png
Icon rigs.png
Icon rigs.png
FITTING DIFFICULTY
EVE VERSION
RET 1.0
ALPHA CAN USE
UNSET
EFT
SKILLS
NOTES
RECOMMENDED SKILLS
  • Energy Grid Upgrades II
  • Shield Operation II
  • Gunnery II
  • Small Projectile Turret III
  • Afterburner I
  • Minmatar Frigate III
  • Shield Upgrades I
NOTES
  • With recommended skills, this setup tanks 20 dps from Angels and can run the afterburner for over 5 minutes.
  • You could run the afterburner indefinitely either by training Afterburner III and Energy Systems Operation III or by replacing one Shield Power Relay with a Power Diagnostic System I (weakening the tank slightly).
  • With Engineering IV you have the option of fitting 150mm autocannons.
Tackle
Rifter: Tackle
EFT
[Rifter, Tackle]
125mm Gatling AutoCannon II

Limited 1MN Microwarpdrive I
Faint Epsilon Warp Scrambler I
Medium Shield Extender II

Damage Control II
Nanofiber Internal Structure II
Gyrostabilizer II

Small Anti-EM Screen Reinforcer I
Small Anti-Thermal Screen Reinforcer I


Fitting template high slot label.png
icon?size=64&.png
icon?size=64&.png
icon?size=64&.png
Icon hi slot.png
Fitting template mid slots label.png
icon?size=64&.png
icon?size=64&.png
icon?size=64&.png
Fitting template low slots label.png
icon?size=64&.png
icon?size=64&.png
icon?size=64&.png
Fitting template subsystem slots label.png
Fitting template drone slots label.png
Fitting template charge slots label.png
Fitting template rig slots label.png
icon?size=64&.png
icon?size=64&.png
icon?size=64&.png
FITTING DIFFICULTY
EVE VERSION
RUBI 1.0
ALPHA CAN USE
UNSET
EFT
SKILLS
NOTES
RECOMMENDED SKILLS
NOTES
  • Meta mods as necessary (for SP/ISK considerations)
  • Fly a Slasher or Merlin instead


Tactics

For Tackling in a Rifter, spiraling is key. The ship is agile and fast enough that a pilot can use a standard spiral with a MWD. The only concern will be on final approach (30 km or so) to pulse the MWD so that the increased signature radius doesn't come in to play as much. If the ship is AB fit, the pilot may consider tightening the Spiral slightly, risking a little more (but still tankable) damage in order to decrease closing time.

Both of these techniques are elaborated in the EVE uni guide to tackling

Roles

Solo PVP

The Rifter is an excellent ship for rookie pilots to learn their trade in due to the ship's endurance and it's low cost.

The Rookie Rifter guide nothing more needs to be said aside from reference to this excellent piece of work.

In Uni blobs

Mainly used in a tackling role. Focus is therefore on EITHER a MWD or an AB - MWD for sheer speed but at increased sig radius, AB provides a speed boost without the penalty to the increase sig radius, It is much a matter of personal preference but bear in mind that a MWD makes you a whole world easier to target!

For more on tackling please see:
EVE uni guide to tackling

Notes

This vessel qualifies for the University Ship Replacement Program, PYOS, and BYOM.