More actions
Corrected Training times |
m →Fitting: AB armour tanked ships don't kite |
||
| Line 261: | Line 261: | ||
shipDNA=633:7487;3:5302;5:2048;1:6295;1:11269;2:20353;1:31011;1:31300;2:222;1:29013;5:29015;5::| | shipDNA=633:7487;3:5302;5:2048;1:6295;1:11269;2:20353;1:31011;1:31300;2:222;1:29013;5:29015;5::| | ||
skills=| | skills=| | ||
notes=This is a good balance between tank and range. With some sensor boosters it can lock out to tornado max range, and dampen down those snipers (Locks to 121km, optimals at 114). At around 29k EHP, the tank isn't bad either.</li><li>Guns can be replaced with rocket launchers or whatever people want to use or can fit.</li><li>Instead of using a prop mod, try to learn how to make tacticals and use them to maneuver around. MWD can be fitted if going to null sec or w hole space for the bubbles. Since a lot of Uni fleets fight at gates and isn't really kiting around, if the MWD can be dropped, then drop it for more damps.}} | notes=This is a good balance between tank and range. With some sensor boosters it can lock out to tornado max range, and dampen down those snipers (Locks to 121km, optimals at 114). At around 29k EHP, the tank isn't bad either.</li><li>Guns can be replaced with rocket launchers or whatever people want to use or can fit.</li><li>Instead of using a prop mod, try to learn how to make tacticals and use them to maneuver around. MWD can be fitted if going to null sec or w hole space for the bubbles. Since a lot of Uni fleets fight at gates and isn't really kiting around, if the MWD can be dropped, then drop it for more damps.}} | ||
==Tactics== | ==Tactics== | ||
Be aware of the various sensor ranges of different ships. This is similar to how ECM pilots need to know what ships use what type of sensors. If you suspect the ship you are damping has lost their locks because its targets are outside the sensor range, immediately switch to sensor resolution scripts and destroy their resolution so they take forever to relock. If you do both on the same ship, they can be made to be almost as helpless as perma jams from falcon. Sometimes even more helpless if they have no drones or you just killed their drones. This trick is especially useful against logi. Less useful against snipers but still good against brawlers that like to be up in your face. With two damps each at 50% effect, you can expect to dampen down a ship's sensor range to 1/4th of its normal value without any modifications. It gets less effective after that. | Be aware of the various sensor ranges of different ships. This is similar to how ECM pilots need to know what ships use what type of sensors. If you suspect the ship you are damping has lost their locks because its targets are outside the sensor range, immediately switch to sensor resolution scripts and destroy their resolution so they take forever to relock. If you do both on the same ship, they can be made to be almost as helpless as perma jams from falcon. Sometimes even more helpless if they have no drones or you just killed their drones. This trick is especially useful against logi. Less useful against snipers but still good against brawlers that like to be up in your face. With two damps each at 50% effect, you can expect to dampen down a ship's sensor range to 1/4th of its normal value without any modifications. It gets less effective after that. | ||
Revision as of 16:04, 19 June 2013

RELATED UNI-WIKI REFERENCES
|
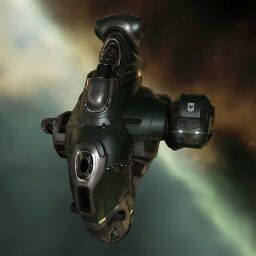
The Celestis cruiser is a versatile ship which can be employed in a myriad of roles, making it handy for small corporations with a limited number of ships. True to Gallente style the Celestis is especially deadly in close quarters combat due to its advanced targeting systems. SHIP BONUSES
Traits:
Ship Attributes
|
Summary
No summary available.
Skills
Further information about additional or recommended skills to pilot Celestis for a specific or it's common role(s) can be written here.
Fitting
5x Damp Armor Low Skill
Light Electron Blaster I
Light Electron Blaster I
Light Electron Blaster I
Remote Sensor Dampener I
Remote Sensor Dampener I
Remote Sensor Dampener I
Remote Sensor Dampener I
Remote Sensor Dampener I
Damage Control I
Energized Adaptive Nano Membrane I
Energized Adaptive Nano Membrane I
1600mm Reinforced Steel Plates I
400mm Reinforced Steel Plates I
Medium Particle Dispersion Projector I
Medium Particle Dispersion Projector I
Medium Particle Dispersion Projector I
Warrior I x5
Hornet EC-300 x5
Targeting Range Dampening Script x5
Scan Resolution Dampening Script x5
Antimatter Charge S x1


- Those trying out the Celestis who have low skills and want to just test the waters can use this low price approach. Everything but the rigs is available from corporation supplies.
- I recommend Warrior or ECM drones.
5x Damp Armor
Anode Light Electron Particle Cannon I
Anode Light Electron Particle Cannon I
Phased Muon Sensor Disruptor I
Phased Muon Sensor Disruptor I
Phased Muon Sensor Disruptor I
Phased Muon Sensor Disruptor I
Phased Muon Sensor Disruptor I
Damage Control II
Energized Adaptive Nano Membrane II
Energized Adaptive Nano Membrane II
1600mm Reinforced Rolled Tungsten Plates I
800mm Reinforced Rolled Tungsten Plates I
Medium Trimark Armor Pump I
Medium Trimark Armor Pump I
Medium Trimark Armor Pump I
Hornet EC-300 x5
Warrior I x5
Targeting Range Dampening Script x5
Scan Resolution Dampening Script x5
Antimatter Charge S x1


- This fit makes you as big as a brick, but also makes you hard to blow up if you have logi in your fleet (estimated 47k EHP, 50k with compensation skills at V). Mostly nice for roams that sit around on gates a lot, like noobs on patrol.
- Downgrade modules to Tech 1 Meta 0-4 based upon your individual skills and isk budget.
5x Damp Armor Range
Modal Light Electron Particle Accelerator I
Modal Light Electron Particle Accelerator I
Modal Light Electron Particle Accelerator I
Phased Muon Sensor Disruptor I
Phased Muon Sensor Disruptor I
Phased Muon Sensor Disruptor I
Phased Muon Sensor Disruptor I
Phased Muon Sensor Disruptor I
Damage Control II
Energized Adaptive Nano Membrane II
Energized Adaptive Nano Membrane II
1600mm Reinforced Steel Plates II
Type-D Attenuation Signal Augmentation
Medium Anti-Explosive Pump I
Medium Particle Dispersion Projector I
Medium Particle Dispersion Projector I
Scan Resolution Dampening Script x5
Targeting Range Dampening Script x5
Antimatter Charge S x1


- This is a good balance between tank and range. With some sensor boosters it can lock out to tornado max range, and dampen down those snipers (Locks to 121km, optimals at 114). At around 29k EHP, the tank isn't bad either.
- Guns can be replaced with rocket launchers or whatever people want to use or can fit.
- Instead of using a prop mod, try to learn how to make tacticals and use them to maneuver around. MWD can be fitted if going to null sec or w hole space for the bubbles. Since a lot of Uni fleets fight at gates and isn't really kiting around, if the MWD can be dropped, then drop it for more damps.
Tactics
Be aware of the various sensor ranges of different ships. This is similar to how ECM pilots need to know what ships use what type of sensors. If you suspect the ship you are damping has lost their locks because its targets are outside the sensor range, immediately switch to sensor resolution scripts and destroy their resolution so they take forever to relock. If you do both on the same ship, they can be made to be almost as helpless as perma jams from falcon. Sometimes even more helpless if they have no drones or you just killed their drones. This trick is especially useful against logi. Less useful against snipers but still good against brawlers that like to be up in your face. With two damps each at 50% effect, you can expect to dampen down a ship's sensor range to 1/4th of its normal value without any modifications. It gets less effective after that.
The celestis is somewhat of an easier ship to fly than the blackbird. You don't miss on your damps unless you are out of range. The ship doesn't particularly need a lot of compromises with the balanced slot layout and increased lows. You have good tank and lots of damps, while also able to be flexible in fitting for sensor range, sensor resolution if you need fast locks, etc. People with projectile, blaster, and missile skills can fit their favorite weapons without much problems.
Some experimentation may let us see whether a kiting celestis that can fly with a kiting gang could be usable or not, by not fitting armor plates but an active tank. ASB or active armor. Probably not. Ewar boats like this one, bonused for range, operate better as solo snipers that utilize a lot of tactical on grid BMs.
The fits don't have drones yet. There's a lot of options there. When going against kiting gangs, warrior IIs and ecm drones. Try to get the medium EC drones if you can fit them in the drone bay. Those EC drones can break the lock of tacklers or other people you somehow allowed to get in range of you, and then you damp their resolution so they are mostly rendered crippled and ineffective.
Notes
This vessel qualifies for the University Ship Replacement Program, PYOS, and BYOM.


