More actions
→Fitting: remove miner |
Changed fittings to use the new template. |
||
| Line 86: | Line 86: | ||
==Fitting== | ==Fitting== | ||
{{:Osprey/Fittings/Logistics}}{{ | <!-- {{:Osprey/Fittings/Logistics}} --> | ||
| | |||
| | {{ShipFitting| | ||
Heavy Ion Blaster II | ship=Osprey| | ||
Heavy Ion Blaster II | shipTypeID=620| | ||
Heavy Ion Blaster II | fitName=POSprey| | ||
Small S95a Partial Shield Transporter | fitID=POSprey| | ||
| | high1name=Large 'Atonement' Ward Projector| | ||
Experimental 10MN | high1typeID=8637| | ||
Large Shield Extender II | high2name=Large 'Atonement' Ward Projector| | ||
Warp Scrambler II | high2typeID=8637| | ||
Stasis Webifier II | high3name=open| | ||
| | high4name=open| | ||
Damage Control II | high5name=open| | ||
Reactor Control Unit II | mid1name=Large Peroxide Capacitor Power Cell| | ||
Nanofiber Internal Structure II | mid1typeID=4873| | ||
| | mid2name=Fixed Parallel Link-Capacitor I| | ||
Void M | mid2typeID=4437| | ||
| | mid3name=Fixed Parallel Link-Capacitor I| | ||
mid3typeID=4437| | |||
| | mid4name=Fixed Parallel Link-Capacitor I| | ||
Medium Anti-EM Screen Reinforcer I | mid4typeID=4437| | ||
Medium Anti-Thermal Screen Reinforcer I | mid5name=open| | ||
Medium Hybrid Burst Aerator I | low1name=Local Power Plant Manager: Capacity Power Relay I| | ||
| | low1typeID=8171| | ||
| | low2name=Local Power Plant Manager: Capacity Power Relay I| | ||
| | low2typeID=8171| | ||
|notes= | low3name=Local Power Plant Manager: Capacity Power Relay I| | ||
low3typeID=8171| | |||
drone1name=open| | |||
}} | drone2name=open| | ||
drone3name=open| | |||
drone4name=open| | |||
drone5name=open| | |||
rig1name=open| | |||
rig2name=open| | |||
rig3name=open| | |||
difficulty=2| | |||
warsop=Y| | |||
warsopReason=| | |||
version=PRE-RET 1.0| | |||
shipDNA=620:8637;2:4437;3:4873;1:8171;3::| | |||
skills=Caldari Cruiser III</li><li>Shield Emission Systems III</li><li>Electronics V</li><li>Engineering V| | |||
notes=The quality of modules you need to use and remain cap stable is highly dependent on skills, so EFT a fit for yourself to see what quality rechargers and relays you need.}} {{ShipFitting| | |||
ship=Osprey| | |||
shipTypeID=620| | |||
fitName=LogiSprey| | |||
fitID=LogiSprey| | |||
high1name=Medium S95a Partial Shield Transporter| | |||
high1typeID=8585| | |||
high2name=Medium S95a Partial Shield Transporter| | |||
high2typeID=8585| | |||
high3name=Medium S95a Partial Shield Transporter| | |||
high3typeID=8585| | |||
high4name=Medium 'Regard' Power Projector| | |||
high4typeID=16495| | |||
high5name=Medium 'Regard' Power Projector| | |||
high5typeID=16495| | |||
mid1name=Large F-S9 Regolith Shield Induction| | |||
mid1typeID=8529| | |||
mid2name=Adaptive Invulnerability Field II| | |||
mid2typeID=2281| | |||
mid3name=Adaptive Invulnerability Field II| | |||
mid3typeID=2281| | |||
mid4name=Experimental 10MN Microwarpdrive I| | |||
mid4typeID=5975| | |||
mid5name=EM Ward Field II| | |||
mid5typeID=2301| | |||
low1name=Damage Control II| | |||
low1typeID=2048| | |||
low2name=Power Diagnostic System II| | |||
low2typeID=1541| | |||
low3name=Warded Gravimetric Backup Cluster I| | |||
low3typeID=20242| | |||
drone1name=Hornet EC-300 x4| | |||
drone1typeID=23707| | |||
drone2name=open| | |||
drone3name=open| | |||
drone4name=open| | |||
drone5name=open| | |||
rig1name=Medium Anti-Thermal Screen Reinforcer I| | |||
rig1typeID=31754| | |||
rig2name=Medium Core Defense Field Extender I| | |||
rig2typeID=31790| | |||
rig3name=Medium Core Defense Field Extender I| | |||
rig3typeID=31790| | |||
difficulty=1| | |||
warsop=Y| | |||
warsopReason=| | |||
version=RET 1.0| | |||
shipDNA=620:8585;3:16495;2:2281;2:2301;1:5975;1:8529;1:1541;1:2048;1:20242;1:31754;1:31790;2:23707;4::| | |||
skills=Caldari Cruiser III</li><li>Shield Emission Systems III</li><li>Electronics V</li><li>Engineering V</li><li>Shield Upgrades IV| | |||
notes=Rigs can be missed out, but they've been selected for low cost. Use a second PDS if you have power grid problems.}} | |||
{{ShipFitting| | |||
ship=Osprey| | |||
shipTypeID=620| | |||
fitName=LowSPrey| | |||
fitID=LowSPrey| | |||
high1name=Medium S95a Partial Shield Transporter| | |||
high1typeID=8585| | |||
high2name=Medium S95a Partial Shield Transporter| | |||
high2typeID=8585| | |||
high3name=Medium S95a Partial Shield Transporter| | |||
high3typeID=8585| | |||
high4name=Medium 'Regard' Power Projector| | |||
high4typeID=16495| | |||
high5name='Regard' Power Projector| | |||
high5typeID=5091| | |||
mid1name=Large Shield Extender II| | |||
mid1typeID=3841| | |||
mid2name=Adaptive Invulnerability Field II| | |||
mid2typeID=2281| | |||
mid3name=Adaptive Invulnerability Field II| | |||
mid3typeID=2281| | |||
mid4name=Experimental 10MN Afterburner I| | |||
mid4typeID=6005| | |||
mid5name=Large Shield Extender II| | |||
mid5typeID=3841| | |||
low1name=Damage Control II| | |||
low1typeID=2048| | |||
low2name=Warded Gravimetric Backup Cluster I| | |||
low2typeID=20242| | |||
low3name=Warded Gravimetric Backup Cluster I| | |||
low3typeID=20242| | |||
drone1name=open| | |||
drone2name=open| | |||
drone3name=open| | |||
drone4name=open| | |||
drone5name=open| | |||
rig1name=Medium Anti-EM Screen Reinforcer I| | |||
rig1typeID=31718| | |||
rig2name=Medium Core Defense Field Extender I| | |||
rig2typeID=31790| | |||
rig3name=Medium Core Defense Field Extender I| | |||
rig3typeID=31790| | |||
difficulty=1| | |||
warsop=Y| | |||
warsopReason=| | |||
version=RET 1.0| | |||
shipDNA=620:5091;1:8585;3:16495;1:2281;2:3841;2:6005;1:2048;1:20242;2:31718;1:31790;2::| | |||
skills=Caldari Cruiser III</li><li>Shield Emission Systems III</li><li>Electronics V</li><li>Engineering V</li><li>Shield Upgrades IV| | |||
notes=Rigs can be missed out, but they've been selected for low cost. Use a second PDS if you have power grid problems.}} {{ShipFitting| | |||
ship=Osprey| | |||
shipTypeID=620| | |||
fitName=Battle Osprey| | |||
fitID=Battle-Osprey| | |||
high1name=Heavy Ion Blaster II| | |||
high1typeID=3138| | |||
high2name=Heavy Ion Blaster II| | |||
high2typeID=3138| | |||
high3name=Heavy Ion Blaster II| | |||
high3typeID=3138| | |||
high4name=Small S95a Partial Shield Transporter| | |||
high4typeID=8537| | |||
high5name=open| | |||
mid1name=Experimental 10MN Microwarpdrive I| | |||
mid1typeID=5975| | |||
mid2name=Large Shield Extender II| | |||
mid2typeID=3841| | |||
mid3name=Warp Scrambler II| | |||
mid3typeID=448| | |||
mid4name=Stasis Webifier II| | |||
mid4typeID=527| | |||
mid5name=open| | |||
low1name=Damage Control II| | |||
low1typeID=2048| | |||
low2name=Reactor Control Unit II| | |||
low2typeID=1355| | |||
low3name=Nanofiber Internal Structure II| | |||
low3typeID=2605| | |||
drone1name=Hobgoblin II x4| | |||
drone1typeID=2456| | |||
drone2name=open| | |||
drone3name=open| | |||
drone4name=open| | |||
drone5name=open| | |||
charge1name=Void M x1| | |||
charge1typeID=12789| | |||
charge2name=Null M x1| | |||
charge2typeID=12785| | |||
charge3name=open| | |||
charge4name=open| | |||
charge5name=open| | |||
rig1name=Medium Anti-EM Screen Reinforcer I| | |||
rig1typeID=31718| | |||
rig2name=Medium Anti-Thermal Screen Reinforcer I| | |||
rig2typeID=31754| | |||
rig3name=Medium Hybrid Burst Aerator I| | |||
rig3typeID=31528| | |||
difficulty=2| | |||
warsop=Y| | |||
warsopReason=| | |||
version=PRE-RET 1.0| | |||
shipDNA=620:3138;3:8537;1:448;1:527;1:3841;1:5975;1:1355;1:2048;1:2605;1:31528;1:31718;1:31754;1:2456;4:12785;1:12789;1::| | |||
skills=Caldari Cruiser III</li><li>Shield Emission Systems III</li><li>Electronics V</li><li>Engineering V</li><li>Shield Upgrades IV| | |||
notes=A combat ready Osprey capable of pushing out 257 DPS with Void M or 206 DPS with Null M, which is enough to catch smaller sized foes off guard.</li><li>Small shield transporter has sufficient range (28.8km) and can refill Osprey's drone's shield in one cycle.}} | |||
==Tactics== | ==Tactics== | ||
Revision as of 21:35, 23 February 2013

RELATED UNI-WIKI REFERENCES
|
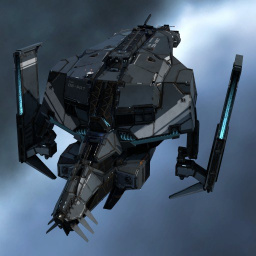
The Osprey originally offered excellent versatility and power for what was considered a comparably low price. After its redesign, its inbuilt mining technology - now a little creaky and long in the tooth - was gutted from the Osprey and replaced in its entirety with tech of a different type, capable of high energy and shield transfers. SHIP BONUSES
Caldari Cruiser Skill Bonus:
Ship Attributes
|

Summary
The Osprey is a T1 logistics ship, with bonuses to shield transfers and energy transfers. The Osprey is not designed to be cap stable on its own, but instead to trade capacitor with other Ospreys. Because of the 200% bonus to energy transfer amount, Ospreys trading energy transfers to each other effectively creates a large amount of capacitor out of nothing. This allows Ospreys to be cap stable with lower skills than its sister ship the Scythe, and makes it resistant to energy neuts. On the down side this makes it more vulnerable to jams, because a jammed osprey not only can't rep but also can't give capacitor, reducing its partners' ability to rep.
Skills
Further information about additional or recommended skills to pilot Osprey for a specific or it's common role(s) can be written here.
Fitting
POSprey
Large 'Atonement' Ward Projector
Large 'Atonement' Ward Projector
Large Peroxide Capacitor Power Cell
Fixed Parallel Link-Capacitor I
Fixed Parallel Link-Capacitor I
Fixed Parallel Link-Capacitor I
Local Power Plant Manager: Capacity Power Relay I
Local Power Plant Manager: Capacity Power Relay I
Local Power Plant Manager: Capacity Power Relay I


- Caldari Cruiser III
- Shield Emission Systems III
- Electronics V
- Engineering V
- The quality of modules you need to use and remain cap stable is highly dependent on skills, so EFT a fit for yourself to see what quality rechargers and relays you need.
LogiSprey
Medium S95a Partial Shield Transporter
Medium S95a Partial Shield Transporter
Medium S95a Partial Shield Transporter
Medium 'Regard' Power Projector
Medium 'Regard' Power Projector
Large F-S9 Regolith Shield Induction
Adaptive Invulnerability Field II
Adaptive Invulnerability Field II
Experimental 10MN Microwarpdrive I
EM Ward Field II
Damage Control II
Power Diagnostic System II
Warded Gravimetric Backup Cluster I
Medium Anti-Thermal Screen Reinforcer I
Medium Core Defense Field Extender I
Medium Core Defense Field Extender I
Hornet EC-300 x4


- Caldari Cruiser III
- Shield Emission Systems III
- Electronics V
- Engineering V
- Shield Upgrades IV
- Rigs can be missed out, but they've been selected for low cost. Use a second PDS if you have power grid problems.
LowSPrey
Medium S95a Partial Shield Transporter
Medium S95a Partial Shield Transporter
Medium S95a Partial Shield Transporter
Medium 'Regard' Power Projector
'Regard' Power Projector
Large Shield Extender II
Adaptive Invulnerability Field II
Adaptive Invulnerability Field II
Experimental 10MN Afterburner I
Large Shield Extender II
Damage Control II
Warded Gravimetric Backup Cluster I
Warded Gravimetric Backup Cluster I
Medium Anti-EM Screen Reinforcer I
Medium Core Defense Field Extender I
Medium Core Defense Field Extender I


- Caldari Cruiser III
- Shield Emission Systems III
- Electronics V
- Engineering V
- Shield Upgrades IV
- Rigs can be missed out, but they've been selected for low cost. Use a second PDS if you have power grid problems.
Battle Osprey
Heavy Ion Blaster II
Heavy Ion Blaster II
Heavy Ion Blaster II
Small S95a Partial Shield Transporter
Experimental 10MN Microwarpdrive I
Large Shield Extender II
Warp Scrambler II
Stasis Webifier II
Damage Control II
Reactor Control Unit II
Nanofiber Internal Structure II
Medium Anti-EM Screen Reinforcer I
Medium Anti-Thermal Screen Reinforcer I
Medium Hybrid Burst Aerator I
Hobgoblin II x4
Void M x1
Null M x1


- Caldari Cruiser III
- Shield Emission Systems III
- Electronics V
- Engineering V
- Shield Upgrades IV
- A combat ready Osprey capable of pushing out 257 DPS with Void M or 206 DPS with Null M, which is enough to catch smaller sized foes off guard.
- Small shield transporter has sufficient range (28.8km) and can refill Osprey's drone's shield in one cycle.
Tactics
No sub-article about Osprey roles or piloting tactics. You can write them here.
Notes
This vessel qualifies for the University PYOS, BYOM, and Mining Loaner Fleet programs.


