More actions
Drebin 679 (talk | contribs) m →Patch History: AWB, replaced: {{ShipsMatrix}} → {{ShipsMatrix|expgroup=pirates}} |
m Change spelling: I am aware that armour is not initially wrong but the item name in-game is spelled armor so to avoid confusion I changed all spelling to armor. |
||
| (13 intermediate revisions by 7 users not shown) | |||
| Line 1: | Line 1: | ||
<onlyinclude>{{{{#if:{{{mode|}}}|{{#switch:{{{mode}}}|box=ShipBoxLarge|#default=ShipBoxTooltip}}|ShipArticle}} <!-- Template marker : DON'T EDIT LINE --> | <onlyinclude>{{{{#if:{{{mode|}}}|{{#switch:{{{mode}}}|box=ShipBoxLarge|#default=ShipBoxTooltip}}|ShipArticle}} <!-- Template marker : DON'T EDIT LINE --> | ||
<!----------------------------------------------------------- | <!----------------------------------------------------------- | ||
* SHIP ATTRIBUTES SECTION (last update : | * SHIP ATTRIBUTES SECTION (last update : 2022-03-10) | ||
------------------------------------------------------------- | ------------------------------------------------------------- | ||
* on editing the attributes, please make sure that you don't | * on editing the attributes, please make sure that you don't | ||
* leave/ | * leave/mistype any tags required. please follow the same | ||
* format below and edit only the values (after the = sign). | * format below and edit only the values (after the = sign). | ||
-------------------------------------------------------------> | -------------------------------------------------------------> | ||
| Line 10: | Line 10: | ||
| shipimg=Bhaalgorn.jpg | | shipimg=Bhaalgorn.jpg | ||
| shipname=Bhaalgorn | | shipname=Bhaalgorn | ||
| class=Battleship | | class=Battleship | ||
| grouping=Pirate Faction | | grouping=Pirate Faction Battleships | ||
| hulltype=Armageddon Class | | hulltype=Armageddon Class | ||
| faction=Blood Raiders | | faction=Blood Raiders | ||
| variations= {{Ship|Armageddon}}, {{Ship|Redeemer}}, {{Ship|Armageddon Navy Issue}}, {{Ship|Armageddon Imperial Issue}} | |||
| tech=F | |||
| variations={{Ship|Armageddon | |||
| tech=F | |||
| powergrid=18,400 MW | | powergrid=18,400 MW | ||
| cpu=588 tf | | cpu=588 tf | ||
| capacitor=7,500 GJ | | capacitor=7,500 GJ | ||
| highs=7 | | highs=7 | ||
| turrets=4 | | turrets=4 | ||
| Line 28: | Line 26: | ||
| mediums=5 | | mediums=5 | ||
| lows=7 | | lows=7 | ||
| mass=97,100,000 kg | | mass=97,100,000 kg | ||
| volume= | | volume= 470,000 m³ | ||
| cargohold= | |||
| cargohold= 845 m³ | |||
| extraholdtype= | |||
| extrahold= | | extrahold= | ||
| dronebay=150 | | dronebay=150 m³ | ||
| bandwidth=100 Mbit/sec | | bandwidth=100 Mbit/sec | ||
|quote=Fill thy vessel with thine enemy's wine<br>And be fortified by it. | |||
|quote_attribution=Sanicanonical Scriptures, book for Redemption 15:9 | |||
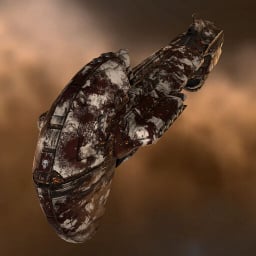
| info=Named after a child-devouring demon of Amarrian legend, the Bhaalgorn is the pride and joy of the Blood Raider cabal. Though it is known to be based on an Armageddon blueprint, the design's origin remains shrouded in mystery. Those of a superstitious persuasion whisper in the dark of eldritch ceremonies and arcane rituals, but for most people, the practical aspect of the matter will more than suffice: you see one of these blood-red horrors looming on the horizon, it's time to make yourself scarce. | | info=Named after a child-devouring demon of Amarrian legend, the Bhaalgorn is the pride and joy of the Blood Raider cabal. Though it is known to be based on an Armageddon blueprint, the design's origin remains shrouded in mystery. Those of a superstitious persuasion whisper in the dark of eldritch ceremonies and arcane rituals, but for most people, the practical aspect of the matter will more than suffice: you see one of these blood-red horrors looming on the horizon, it's time to make yourself scarce. | ||
| bonuses=<b>Minmatar Battleship bonuses (per skill level):</b><br>20% bonus to Stasis Webifier optimal range<br> | | bonuses= <b>Minmatar Battleship bonuses (per skill level):</b><br> | ||
20% bonus to Stasis Webifier optimal range<br> | |||
'''Amarr Battleship bonuses (per skill level):'''<br> | |||
15% bonus to Energy Nosferatu and Energy Neutralizer drain amount<br> | |||
'''Role Bonus:'''<br> | |||
100% bonus to Large Energy Turret damage<br> | |||
• Energy Nosferatu fitted to this ship will drain targeted ship's capacitor regardless of your own capacitor level<br> | |||
100% bonus to Shield Extender hitpoints<br> | |||
50% bonus to Armor Plate hitpoints<br> | |||
5% Additional bonus to Reinforced Bulkhead hitpoints | |||
| structurehp=10,230 HP | | structurehp=10,230 HP | ||
| armorhp=11,935 HP | |||
| armorem=50 | |||
| armortherm=35 | |||
| armorkin=25 | |||
| armorexp=20 | |||
| shieldhp=10,230 HP | | shieldhp=10,230 HP | ||
| shieldem=0 | | shieldem=0 | ||
| shieldtherm=20 | |||
| shieldkin=40 | |||
| shieldexp=50 | | shieldexp=50 | ||
| maxvelocity=101 m/sec | | maxvelocity=101 m/sec | ||
| inertia=0.125 | | inertia=0.125 | ||
| warpspeed=3 AU/s | | warpspeed=3 AU/s | ||
| warptime=16.83 s | | warptime=16.83 s | ||
| targetrange= | |||
| targetrange= 86.4 km | |||
| maxlockedtargets=8 | |||
| sigradius=400 m | | sigradius=400 m | ||
| | | scanres=130 mm | ||
| sensortype=RADAR | | sensortype=RADAR | ||
| sensorvalue=28 points | | sensorvalue=28 points | ||
| reqskills= * {{RequiredSkill|Amarr Battleship|I}} | |||
** {{RequiredSkill|Spaceship Command|IV}} | |||
** {{RequiredSkill|Amarr Battlecruiser|III}} | |||
*** {{RequiredSkill|Spaceship Command|III}} | |||
*** {{RequiredSkill|Amarr Cruiser|III}} | |||
**** {{RequiredSkill|Spaceship Command|II}} | |||
**** {{RequiredSkill|Amarr Destroyer|III}} | |||
***** {{RequiredSkill|Amarr Frigate|III}} | |||
****** {{RequiredSkill|Spaceship Command|I}} | |||
* {{RequiredSkill|Minmatar Battleship|I}} | |||
** {{RequiredSkill|Spaceship Command|IV}} | |||
** {{RequiredSkill|Minmatar Battlecruiser|III}} | |||
*** {{RequiredSkill|Spaceship Command|III}} | |||
*** {{RequiredSkill|Minmatar Cruiser|III}} | |||
**** {{RequiredSkill|Spaceship Command|II}} | |||
**** {{RequiredSkill|Minmatar Destroyer|III}} | |||
***** {{RequiredSkill|Minmatar Frigate|III}} | |||
****** {{RequiredSkill|Spaceship Command|I}} | |||
| totaltraintime=6d 16h 41m 50s | | totaltraintime=6d 16h 41m 50s | ||
| forumlinks= | | forumlinks= | ||
| wikireferences= | | wikireferences= | ||
| Line 85: | Line 103: | ||
| highlights3= | | highlights3= | ||
| highlights4= | | highlights4= | ||
}}</onlyinclude> <!-- Template marker : DON'T EDIT LINE --> | }}</onlyinclude> | ||
<!-- Template marker : DON'T EDIT LINE --> | |||
<!----------------------------------------------------------------------------------------- | <!----------------------------------------------------------------------------------------- | ||
| Line 91: | Line 111: | ||
-------------------------------------------------------------------------------------------> | -------------------------------------------------------------------------------------------> | ||
==Summary== | == Summary == | ||
The '''Bhaalgorn''' is a Blood Raider pirate faction battleship with bonuses to [[Energy Neutraliser|Energy Neutralizer]] and Nosferatu drain amount and [[Stasis Webifier Module|Stasis Webifier]] range making it excellent for PvP of all fleet sizes | The '''Bhaalgorn''' is a Blood Raider pirate faction battleship with bonuses to [[Energy Neutraliser|Energy Neutralizer]] and Nosferatu drain amount and [[Stasis Webifier Module|Stasis Webifier]] range, making it excellent for PvP of all fleet sizes despite being relatively expensive. The Bhaalgorn is primarily a Large Energy Turret using ship and gets a 100% role bonus to Large Energy Turret damage, meaning that the turrets used in its four turret hardpoints do the same effective damage as eight. Bhaalgorns are mostly found with Heavy Energy Neutralizers in their spare high slots, or in certain situations in all of their high slots, as the Amarr Battleship bonus to drain amount makes the Bhaalgorn deadly at capacitor warfare, being huge threats to even the biggest of ships. Due to the Bhaalgorn's slot layout of five mid slots and seven low slots, the Bhaalgorn is mostly found in an armor tanking configuration. This is beneficial as it also allows the pilot to fit Stasis Webifiers to the battleship, for which the hull gets a range bonus. | ||
The Bhaalgorn's bonus to Energy Neutralizing makes it a popular choice for wormholes, as it can bring the power of its bonused Energy Neutralizers upon the enemy whilst not endangering the mass limit of [[Wormholes]] too much. | The Bhaalgorn's bonus to Energy Neutralizing makes it a popular choice for wormholes, as it can bring the power of its bonused Energy Neutralizers upon the enemy whilst not endangering the mass limit of [[Wormholes]] too much. | ||
On other ships, Energy Nosferatus are limited by only having an effect when the ship's capacitor is lower than its target | On other ships, Energy Nosferatus are limited by only having an effect when the ship's capacitor is lower than that of its target; the Bhaalgorn's innate bonus dispenses with this mechanic, allowing the Bhaalgorn to use Energy Nosferatus on hostiles regardless of the Bhaalgorn's capacitor level. This makes Nosferatus very viable on this battleship. | ||
==Skills== | == Skills == | ||
The Bhaalgorn is a very capacitor intensive ship, with Lasers having the highest capacitor use of all weaponry and Heavy Energy Neutralizers also being extremely capacitor hungry | The Bhaalgorn is a very capacitor-intensive ship, with Lasers having the highest capacitor use of all weaponry and Heavy Energy Neutralizers also being extremely capacitor hungry; as such, any and all capacitor skills help the Bhaalgorn tremendously. The Bhaalgorn's main tank choice in PvP is armor - and a lot of it - so having skills that enable Tech 2 Armor modules, such as {{sk|Hull Upgrades|V}}, are practically essential to this ship's survivability. As a pirate faction battleship, the Bhaalgorn is very expensive, so flying the ship with sub-par skills can turn this ship into a liability, waiting for the enemy fleet to gladly break it apart and reap the delicious killmail. Level V on all the below mentioned skills should be a very early goal for any Bhaalgorn pilot in order to ensure that one is getting the most out of such a capable but expensive battleship. | ||
*{{sk|Capacitor Management|mult=yes}} - A higher capacitor capacity increases the amount of "buffer" cap the Bhaalgorn has, meaning that, if a situation arises in which the Bhaalgorn pilot must use a lot of capacitor intensive modules at once, | * {{sk|Capacitor Management|mult=yes}} - A higher capacitor capacity increases the amount of "buffer" cap the Bhaalgorn has, meaning that, if a situation arises in which the Bhaalgorn pilot must use a lot of capacitor-intensive modules at once, this may be sustained for longer. Additionally, whilst the capacitor capacity increases, the recharge time remains fixed, meaning that there is an overall gain in energy recharge rate. | ||
*{{sk|Capacitor Emission Systems|mult=yes}} - Bhaalgorns are almost always found equipped with some sort of Energy Neutralizer module. These modules (especially the Heavy variants) are extremely cap intensive over long periods of time, and Capacitor Emission Systems reduces the amount of capacitor used by any modules the skill by 5% per level. At Rank V, this means Energy Neutralizers cost 25% less capacitor, and so the Bhaalgorn has much better staying power over a longer period of time | * {{sk|Capacitor Emission Systems|mult=yes}} - Bhaalgorns are almost always found equipped with some sort of Energy Neutralizer module. These modules (especially the Heavy variants) are extremely cap-intensive over long periods of time, and Capacitor Emission Systems reduces the amount of capacitor used by any modules of the skill by 5% per level. At Rank V, this means Energy Neutralizers cost 25% less capacitor, and so the Bhaalgorn has much better staying power over a longer period of time where the situation requires extensive use of its neuts. | ||
*{{sk|Capacitor Systems Operation|mult=yes}} - Alongside the aforementioned skills, this skill increases the longevity of the ship's capacitor by allowing it to recharge faster. Combined with Capacitor Management, a ship's capacitor can be made to last | * {{sk|Capacitor Systems Operation|mult=yes}} - Alongside the aforementioned skills, this skill increases the longevity of the ship's capacitor by allowing it to recharge faster. Combined with Capacitor Management, a ship's capacitor can be made to last significantly longer and recharge faster. This skill also makes the Bhaalgorn more resistant to being neutralized itself, as Heavy Neutralizers have a 24-second cycle time, and higher levels of this skill allow the ship to regenerate more capacitor during the period between neutralizer cycles. | ||
*{{sk|Controlled Bursts|mult=yes}} - The Bhaalgorn's main weaponry is Large Energy Turrets | * {{sk|Controlled Bursts|mult=yes}} - The Bhaalgorn's main weaponry is Large Energy Turrets; these turrets are the most capacitor heavy of all guns. Alongside the capacitor already being devoted to Energy Neutralizers, most Bhaalgorns have Large Energy Turrets fitted, so higher levels of this skill ensure the burden placed on the ship by these turrets is as minimal as can be. Wormhole Bhaalgorns are usually found without guns, so this is a skill some Bhaalgorn pilots can afford to miss out on getting to V. | ||
*{{sk|Hull Upgrades|mult=yes}} - An unskippable skill for any armor tanking ship, Hull Upgrades both increases a ship's maximum armor hitpoints by 5% per level and enables use of all sorts of armor modules. Bhaalgorns are almost always found with 1600mm Reinforced Steel Plates and, with Battleship class | * {{sk|Hull Upgrades|mult=yes}} - An unskippable skill for any armor tanking ship, Hull Upgrades both increases a ship's maximum armor hitpoints by 5% per level and enables use of all sorts of armor modules. Bhaalgorns are almost always found with 1600mm Reinforced Steel Plates and, with Battleship class ships' generous power grid allocation, Tech 2 variants of these armor plates can be easily fit onto the ship. The Bhaalgorn has no innate bonus to survivability in terms of resists or raw HP, so every little bit of resists helps. | ||
*{{sk|Armor Rigging|mult=yes}} - Tech 2 armor rigs usually have quite significant bonuses over their Tech 1 siblings, with Trimark Armor Pumps being no exception to this. As was just mentioned, the Bhaalgorn isn't bonused to survivability in any way, so the bonus to armor HP afforded by Trimark Armor Pump II is nothing to scoff at. Higher levels of Armor Rigging reduce the penalty to maximum velocity that is found on the Trimark | * {{sk|Armor Rigging|mult=yes}} - Tech 2 armor rigs usually have quite significant bonuses over their Tech 1 siblings, with Trimark Armor Pumps being no exception to this. As was just mentioned, the Bhaalgorn isn't bonused to survivability in any way, so the bonus to armor HP afforded by Trimark Armor Pump II is nothing to scoff at. Higher levels of Armor Rigging reduce the penalty to maximum velocity that is found on the Trimark armor Pump. | ||
*Amarr/Minmatar Battleship - Depending on the ship's intended role (whether it be large fleet PvP, solo work, wormholes, incursions etc.), getting the appropriate skill up will greatly increase the Bhaalgorn's potential. For Incursion uses, {{sk|Minmatar Battleship|mult=yes}} will be a boon to the ship's potential, whilst the {{sk|Amarr Battleship|mult=yes}} is not as useful, as NPCs are immune to Energy Neutralizing effects. In a Wormhole, or in solo work, getting both Battleship skills up is advisable as both bonuses will aid in the ship's potential. | * Amarr/Minmatar Battleship - Depending on the ship's intended role (whether it be large fleet PvP, solo work, wormholes, incursions etc.), getting the appropriate skill up will greatly increase the Bhaalgorn's potential. For Incursion uses, {{sk|Minmatar Battleship|mult=yes}} will be a boon to the ship's potential, whilst the {{sk|Amarr Battleship|mult=yes}} is not as useful, as NPCs are immune to Energy Neutralizing effects. In a Wormhole, or in solo work, getting both Battleship skills up is advisable as both bonuses will aid in the ship's potential. | ||
*General Gunnery Supports - All the Gunnery support skills (such as {{sk|Rapid Firing|mult=yes}} and {{sk|Sharpshooter|mult=yes}}) are useful to the Bhaalgorn's damage potential when using Large Energy Turrets. {{sk|Trajectory Analysis|mult=yes}} | * General Gunnery Supports - All the Gunnery support skills (such as {{sk|Rapid Firing|mult=yes}} and {{sk|Sharpshooter|mult=yes}}) are useful to the Bhaalgorn's damage potential when using Large Energy Turrets. {{sk|Trajectory Analysis|mult=yes}} could perhaps be left slightly lower than the other skills, as Energy Turrets generally have negligible fall-off. | ||
== | == Tactics == | ||
* Microwarpdrive use should be kept to a minimum, as 500mn Microwarpdrives are very capacitor-intensive. | |||
* Stagger your Energy Neutralizers so that they each complete their cycles at different times. This makes it very hard to use Capacitor Boosters to mitigate the neutralization. Alternatively, if you believe the target is not cap boosted, use them all at once to alpha its capacitor, thus reducing its recharge rate to a minimum; once it is cap-dry, you can then stagger them to keep it that way. | |||
* Use your webs on different targets. Because they aren't bonused to slowing amount, they're heavily stacking penalized when several are put on one ship. | |||
* Because the Bhaalgorn is bonused to Stasis Webifier range, you'll have an easy time catching kiting frigates or stragglers on field with your webifiers. | |||
* Don't be scared to use fewer energy neutralizers at the same time to give your capacitor a chance to regenerate. As long as your foe is tackled, you have plenty of time to neutralize it later. | |||
* Don't waste your capacitor on your guns if you are having capacitor trouble. Unless your fleet composition uses Bhaalgorn as your main DPS, there will be other ships in fleet with more DPS than yours. | |||
* For PvE, fit a full rack of lasers, whether pulse or beam, and use 3 nosferatus (preferably T2, deadspace, or faction) to keep your capacitor charged. Typically you will have enough cap leftover to power 1 or 2 large armor repairers. Use your long-range webs to ensure you can hit your targets. | |||
== | == Notes == | ||
For more information about capacitor warfare and other capacitor warfare using ships see [[Capacitor warfare]]. | |||
== Patch History == | |||
{{Expansion past| | |||
'''20.03 Release - Build: 2013787 - 2022-03-08''' - ''"Road to Fanfest" Update'' ([https://www.eveonline.com/news/view/patch-notes-version-20-03#Ship-Balancing Patch Notes]) | |||
* | Brand new Role bonuses have been added to all battleships (excluding the Praxis). | ||
* 50% bonus to HP from all Armor Plates | |||
* 100% bonus to HP from all Shield Extenders | |||
* 5% additive bonus to all Reinforced Bulkhead modules, for those with discerning tastes. | |||
'''18.04 Release - Build: 1706308 - 2020-04-15''' - ''"Surgical Strike" Update'' ([https://www.eveonline.com/news/view/patch-notes-for-18-04-release Patch Notes]) | |||
'''18.04 Release - Build: 1706308 - 2020-04-15''' - ''"Surgical Strike" Update'' ([https://www.eveonline.com/ | |||
* T1, Faction and Pirate Battleship base hp increased by 10% | * T1, Faction and Pirate Battleship base hp increased by 10% | ||
* T1, Faction and Pirate Battleship base scan resolution increased 30% | * T1, Faction and Pirate Battleship base scan resolution increased 30% | ||
| Line 145: | Line 165: | ||
''Every Cruiser, Battlecruiser and Battleship now warps faster than before.'' | ''Every Cruiser, Battlecruiser and Battleship now warps faster than before.'' | ||
* Warp Speed increased from 2 AU/s to 3 AU/s (+1 AU/s) | * Warp Speed increased from 2 AU/s to 3 AU/s (+1 AU/s) | ||
}} | }} | ||
{{ShipsMatrix|expgroup=pirates}} | {{ShipsMatrix|expgroup= pirates}} | ||
[[Category:Ship Database]][[Category:Pirate Faction Ships]] | |||
[[Category:Ship Database]] | |||
[[Category:Pirate Faction Ships]] | |||
[[Category:Pirate Faction Battleships]] | |||
Latest revision as of 06:58, 20 September 2025

High Amount of High Slots
HIGHLIGHTS
High Amount of Low Slots
HIGHLIGHTS
RELATED UNI-WIKI REFERENCES
|
Fill thy vessel with thine enemy's wine
And be fortified by it.
SHIP BONUSES
Minmatar Battleship bonuses (per skill level):
Ship Attributes
|

Summary
The Bhaalgorn is a Blood Raider pirate faction battleship with bonuses to Energy Neutralizer and Nosferatu drain amount and Stasis Webifier range, making it excellent for PvP of all fleet sizes despite being relatively expensive. The Bhaalgorn is primarily a Large Energy Turret using ship and gets a 100% role bonus to Large Energy Turret damage, meaning that the turrets used in its four turret hardpoints do the same effective damage as eight. Bhaalgorns are mostly found with Heavy Energy Neutralizers in their spare high slots, or in certain situations in all of their high slots, as the Amarr Battleship bonus to drain amount makes the Bhaalgorn deadly at capacitor warfare, being huge threats to even the biggest of ships. Due to the Bhaalgorn's slot layout of five mid slots and seven low slots, the Bhaalgorn is mostly found in an armor tanking configuration. This is beneficial as it also allows the pilot to fit Stasis Webifiers to the battleship, for which the hull gets a range bonus.
The Bhaalgorn's bonus to Energy Neutralizing makes it a popular choice for wormholes, as it can bring the power of its bonused Energy Neutralizers upon the enemy whilst not endangering the mass limit of Wormholes too much.
On other ships, Energy Nosferatus are limited by only having an effect when the ship's capacitor is lower than that of its target; the Bhaalgorn's innate bonus dispenses with this mechanic, allowing the Bhaalgorn to use Energy Nosferatus on hostiles regardless of the Bhaalgorn's capacitor level. This makes Nosferatus very viable on this battleship.
Skills
The Bhaalgorn is a very capacitor-intensive ship, with Lasers having the highest capacitor use of all weaponry and Heavy Energy Neutralizers also being extremely capacitor hungry; as such, any and all capacitor skills help the Bhaalgorn tremendously. The Bhaalgorn's main tank choice in PvP is armor - and a lot of it - so having skills that enable Tech 2 Armor modules, such as Hull Upgrades V, are practically essential to this ship's survivability. As a pirate faction battleship, the Bhaalgorn is very expensive, so flying the ship with sub-par skills can turn this ship into a liability, waiting for the enemy fleet to gladly break it apart and reap the delicious killmail. Level V on all the below mentioned skills should be a very early goal for any Bhaalgorn pilot in order to ensure that one is getting the most out of such a capable but expensive battleship.
- Capacitor Management (3x) - A higher capacitor capacity increases the amount of "buffer" cap the Bhaalgorn has, meaning that, if a situation arises in which the Bhaalgorn pilot must use a lot of capacitor-intensive modules at once, this may be sustained for longer. Additionally, whilst the capacitor capacity increases, the recharge time remains fixed, meaning that there is an overall gain in energy recharge rate.
- Capacitor Emission Systems (2x) - Bhaalgorns are almost always found equipped with some sort of Energy Neutralizer module. These modules (especially the Heavy variants) are extremely cap-intensive over long periods of time, and Capacitor Emission Systems reduces the amount of capacitor used by any modules of the skill by 5% per level. At Rank V, this means Energy Neutralizers cost 25% less capacitor, and so the Bhaalgorn has much better staying power over a longer period of time where the situation requires extensive use of its neuts.
- Capacitor Systems Operation (1x) - Alongside the aforementioned skills, this skill increases the longevity of the ship's capacitor by allowing it to recharge faster. Combined with Capacitor Management, a ship's capacitor can be made to last significantly longer and recharge faster. This skill also makes the Bhaalgorn more resistant to being neutralized itself, as Heavy Neutralizers have a 24-second cycle time, and higher levels of this skill allow the ship to regenerate more capacitor during the period between neutralizer cycles.
- Controlled Bursts (2x) - The Bhaalgorn's main weaponry is Large Energy Turrets; these turrets are the most capacitor heavy of all guns. Alongside the capacitor already being devoted to Energy Neutralizers, most Bhaalgorns have Large Energy Turrets fitted, so higher levels of this skill ensure the burden placed on the ship by these turrets is as minimal as can be. Wormhole Bhaalgorns are usually found without guns, so this is a skill some Bhaalgorn pilots can afford to miss out on getting to V.
- Hull Upgrades (2x) - An unskippable skill for any armor tanking ship, Hull Upgrades both increases a ship's maximum armor hitpoints by 5% per level and enables use of all sorts of armor modules. Bhaalgorns are almost always found with 1600mm Reinforced Steel Plates and, with Battleship class ships' generous power grid allocation, Tech 2 variants of these armor plates can be easily fit onto the ship. The Bhaalgorn has no innate bonus to survivability in terms of resists or raw HP, so every little bit of resists helps.
- Armor Rigging (3x) - Tech 2 armor rigs usually have quite significant bonuses over their Tech 1 siblings, with Trimark Armor Pumps being no exception to this. As was just mentioned, the Bhaalgorn isn't bonused to survivability in any way, so the bonus to armor HP afforded by Trimark Armor Pump II is nothing to scoff at. Higher levels of Armor Rigging reduce the penalty to maximum velocity that is found on the Trimark armor Pump.
- Amarr/Minmatar Battleship - Depending on the ship's intended role (whether it be large fleet PvP, solo work, wormholes, incursions etc.), getting the appropriate skill up will greatly increase the Bhaalgorn's potential. For Incursion uses, Minmatar Battleship (8x) will be a boon to the ship's potential, whilst the Amarr Battleship (8x) is not as useful, as NPCs are immune to Energy Neutralizing effects. In a Wormhole, or in solo work, getting both Battleship skills up is advisable as both bonuses will aid in the ship's potential.
- General Gunnery Supports - All the Gunnery support skills (such as Rapid Firing (2x) and Sharpshooter (2x)) are useful to the Bhaalgorn's damage potential when using Large Energy Turrets. Trajectory Analysis (5x) could perhaps be left slightly lower than the other skills, as Energy Turrets generally have negligible fall-off.
Tactics
- Microwarpdrive use should be kept to a minimum, as 500mn Microwarpdrives are very capacitor-intensive.
- Stagger your Energy Neutralizers so that they each complete their cycles at different times. This makes it very hard to use Capacitor Boosters to mitigate the neutralization. Alternatively, if you believe the target is not cap boosted, use them all at once to alpha its capacitor, thus reducing its recharge rate to a minimum; once it is cap-dry, you can then stagger them to keep it that way.
- Use your webs on different targets. Because they aren't bonused to slowing amount, they're heavily stacking penalized when several are put on one ship.
- Because the Bhaalgorn is bonused to Stasis Webifier range, you'll have an easy time catching kiting frigates or stragglers on field with your webifiers.
- Don't be scared to use fewer energy neutralizers at the same time to give your capacitor a chance to regenerate. As long as your foe is tackled, you have plenty of time to neutralize it later.
- Don't waste your capacitor on your guns if you are having capacitor trouble. Unless your fleet composition uses Bhaalgorn as your main DPS, there will be other ships in fleet with more DPS than yours.
- For PvE, fit a full rack of lasers, whether pulse or beam, and use 3 nosferatus (preferably T2, deadspace, or faction) to keep your capacitor charged. Typically you will have enough cap leftover to power 1 or 2 large armor repairers. Use your long-range webs to ensure you can hit your targets.
Notes
For more information about capacitor warfare and other capacitor warfare using ships see Capacitor warfare.
Patch History
| A long, long time ago... |
|---|
|
20.03 Release - Build: 2013787 - 2022-03-08 - "Road to Fanfest" Update (Patch Notes) Brand new Role bonuses have been added to all battleships (excluding the Praxis).
18.04 Release - Build: 1706308 - 2020-04-15 - "Surgical Strike" Update (Patch Notes)
October 2019 Release - 2019-10-15.1 Every Cruiser, Battlecruiser and Battleship now warps faster than before.
|


